$stateProvider.state('dashboard', {
    url: '/user',
    templateUrl: 'pages/dashboard/dashboard.html',
    controller: 'DashboardCtrl',
    controllerAs: 'vm'
});

$urlRouterProvider.otherwise('/login');
Step 2: List events
After logged in, we will move user to a Dashboard screen, which list all events.
First, create new state to represent for Dashboard screen.
Edit app.state.js file
then, create dashboard.html and dashboard.controller.js
mkdir www/pages/dashboard
touch www/pages/dashboard/dashboard.html
touch www/js/controllers/dashboard.controller.js
dashboard.controller.js
(function() {
  angular.module('starter').controller('DashboardCtrl', DashboardController);

  DashboardController.$inject = [];

  function DashboardController() {
    var vm = this;

    ///////

  }

})();
dashboard.html
<ion-view>
Dashboard
</ion-view>
Second, Move to dashboard state after logged in successfully.
To moving between state, we need to use $state service from angular. Hence we inject it into login.controller.js
login.controller.js
LogInController.$inject = ['$state', 'AuthService'];

function LogInController($state, AuthService) {
...
...
AuthService.auth(vm.user).then(function(response){
      // on success
      console.log(response);
      $state.go('dashboard');
    }).catch(function(error){
      // on error
      console.log(error);
    });
Here we are using $state.go() method to move to dashboard state.
What if we want to transfer some data from login state to dashboard state? For example, in dashboard page, we want to display a welcome text: Hello, <user>!
Then, we need to change a bit:
-
We need declare
dashboardstate as parameterized state.
app.state.js
$stateProvider.state('dashboard', {
        url: '/user',
        templateUrl: 'pages/dashboard/dashboard.html',
        controller: 'DashboardCtrl',
        controllerAs: 'vm',
        params: {username:''}
    });
#2. We pass data when goto dashboard state from login state
log.controller.js
$state.go('dashboard', {username:vm.user.username});#3. We read data from $stateParams service when init dashboard state
dashboard.controller.js
var vm = this;
vm.username = $stateParams.username;
#4. We display on page
dashboard.html
<ion-content>
    Hello,
...
Third, On open dashboard screen, load all events and display as list.
dashboard.controller.js
(function() {
  angular.module('starter').controller('DashboardCtrl', DashboardController);

  DashboardController.$inject = ['EventsService'];

  function DashboardController(EventsService) {
    var vm = this;
    vm.events = {};

    vm.onload = onload;

    vm.onload();
    ///////

    function onload(){
      vm.events = EventsService.loadEvents();
      console.log(vm.events);
    }
  }

})();
Here, on open Dashboard page, we call vm.onload() to load all events.
Did you see EventsService? We will create a separate service to get events data from Firebase.
touch www/js/services.events.service.js
event.service.js
(function(){
  angular.module('starter').service('EventsService', EventsService);

  EventsService.$inject = ['$firebaseArray', 'FIREBASE'];

  function EventsService($firebaseArray, FIREBASE){
    this.loadEvents = loadEvents;

    function loadEvents(){
      var ref = new Firebase(FIREBASE.URI);
      return $firebaseArray(ref.child("events"));
    }
  }
})();
Here, we inject $firebaseArray, a service of angularfire, provides a method to work with array objects of Firebase.
Another thing, we inject FIREBASE constants, which include URI of our Firebase database.
We will know how to declare constant later.
Just take a look at loadEvents() method, we just return a firebaseArray object which refer to all events stored on our database.
Define constant
create constant.js file
touch www/js/constant.js
constant.js
(function(){
  angular.module('starter')
    .constant("FIREBASE", {
      "URI": "https://luminous-torch-5124.firebaseio.com/"
    });

})();
This is how we declare a FIREBASE constant.
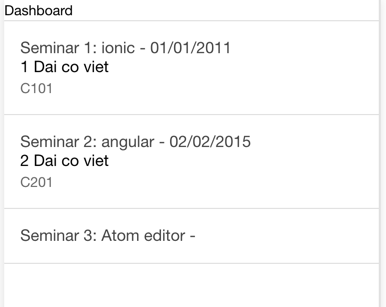
Update dashboard.html to display list of events.
dashboard.html
<ion-view>
Dashboard
<ion-list>
  <ion-item ng-repeat="e in vm.events">
    <ion-card>
      <ion-card-header>
         -
      </ion-card-header>

      <h2></h2>
      <p>

      </p>
    </ion-card>

  </ion-item>
</ion-list>
</ion-view>
Here we use ng-repeat directive of Angular to iterate vm.events array.
Back to browser to see the result: