touch www/js/app.state.js
Step 1: Login page
To-do list:
-
❏ Define a state to represent the Login Page
-
❏ Create Controller, View, Model
-
❏ Create Login Service which will calling Firebase service
Define a State
Understanding state
A state is identify by:
-
A identity route (url path)
-
A content will be shown
Navigating between screens/pages is just navigating between states of application.
Create app.state.js file
By default, ionic includes everything inside app.js file. But we will separate state definition into a single file to make it easy for maintain.
-
First, create
app.state.jsfile
then define a state for login page
(function(){
angular
    .module('starter')
    .config(config);

function config($stateProvider, $urlRouterProvider) {
    $stateProvider.state('login', {
        url: '/login',
        templateUrl: 'pages/login/login.html',
        controller: 'LogInCtrl',
        controllerAs: 'vm'
    });

    $urlRouterProvider.otherwise('/login');
}
})();
Here we define a login state, which refered by /login route path, and will load content from templateUrl pages/login/login.html. At last, it use LogInCtrl as Controller.
Create login.html
mkdir www/pages
mkdir www/pages/login
touch www/pages/login/login.html
and its content will be:
<ion-view title="Please sign in">
  <ion-content class="padding">
    <div class="list">
      <label class="item item-input">
        <input type="text" placeholder="Name" ng-model="vm.user.username">
      </label>
      <label class="item item-input">
        <input type="password" placeholder="Password" ng-model="vm.user.password">
      </label>
    </div>
    <button class="button button-full button-balanced" ng-click="vm.login()">
      Login
    </button>
    <button class="button button-positive button-clear button-full" ui-sref="public.register">Register now!</button>
  </ion-content>
</ion-view>
You will see some angular directives such as: ng-model, ng-click, but we will discuss about them later.
Modify index.html to load content of state.
There are 2 modifications:
-
❏ Load
app.state.jsfile -
❏ Change the part inside
bodytag
<!-- your app's js -->
<script src="js/app.js"></script>

<script src="js/app.state.js"></script>
and
<body ng-app="starter">
      <ui-view></ui-view>
</body>
There are 2 things here:
First, ng-app is an Angular directive, which define the application’s name which will be load and injected into body. Here we said that application named starter will be load. You can find this name in app.js file.
Second, <ui-view> is an Angular tag, which define a place holder for application’s content.
Check the result
Run command:
ionic serve
Browser will be open at http://localhost:8100/#/login
and display as below:
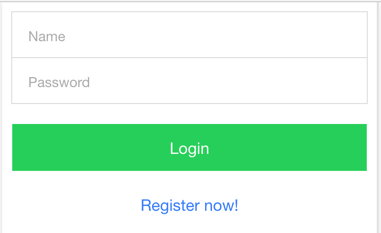
The process flow is, base on the route path (/login), system found a state named login, and load its content (from pages/login/login.html, inject into ui-view and display.
Create controller LogInCtrl
Now we need to create controller.
mkdir www/js/controllers
touch www/js/controllers/login.controller.js
its content should be:
(function(){
angular
    .module('starter')
    .controller('LogInCtrl', LogInController);

function LogInController($scope) {
  var vm = this;
  vm.user = {
    username: '',
    password: ''
  };
  vm.login = login;

  //////////

  function login() {

  };
}
})();
Here we just declare a controller with a user property, which will be bind to the view.
Do you remember ng-model and ng-click in login.html file?
ng-model will bind the value of the Username field to user.username property of $scope. This is a 2-way binding, which means when we change value of user.username property, the changes will be updated to the Username field.
ng-click will bind click event handler of the field to the login method of controller.
Then we need include it into index.html file.
<script src="js/app.state.js"></script>

<script src="js/controllers/login.controller.js"></script>
For now, you would feel this step is very boring. We can do it better with supporting from
webpack.
Let modify login function a bit to see everything is connected.
$scope.login = function() {
    console.log($scope.user.username);
};
Now, back to the browser, enter some text into Username field, then click Login button. You will see entered text is shown in console.
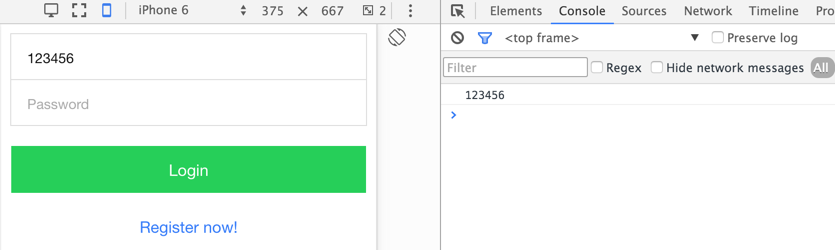
See? When you click Login button, text in the Username textfield will be bound to $scope.user.username property, and login method is called.
OK, now everything is connected. We need to implement the business logic of login process.